How to Use the Apple Pencil on iPad Pro: If you’re an avid iPad Pro user, you know that the Apple Pencil is a powerful tool. But did you know you can also use it on your regular iPad? In this article, we’ll show you how to use the Apple Pencil on your iPad Pro, no matter what device you’re using it on.
If you’re an iPad Pro user, you know that the Apple Pencil is a powerful tool. In this article, we’ll show you how to use the Apple Pencil on your iPad Pro.
Open the App Store
1. Navigate to the App Store on your iPad Pro.
2. Tap the Search button on the bottom of the screen.
3. Type “Apple Pencil” in the search bar and tap on the resulting app.
4. Tap on the Apple Pencil app icon to launch it.
5. Tap on the Settings button in the app.
6. Under General, make sure that Use Pencil is selected and then tap on the switch next to it to turn it on.
7. To use the Apple Pencil, first make sure that you have placed it in its storage section by tapping and holding down on one end and then dragging it to where you want it to be used. Once it is in place, release your finger from the pen and draw with it as if you were using a standard pen or pencil.
Note: If you are using a Finger Scanner to authenticate yourself with your iPad Pro, you will need to hold down one end of the Apple Pencil for two seconds before drawing with it so that the iPad can identify it as being part of your physical device rather than just a virtual one. You can also use this feature if you have misplaced your Apple Pencil.
Just double-tap on the Home button to bring up the multitasking bar and then tap on the App Store icon to launch the App Store, and search for “Apple Pencil”. You can then download the latest version of the app from the App Store.
Search for
– How to Use the Apple Pencil on iPad Pro
– How to Use the Apple Pencil with iPad Pro
If you’re new to the Apple Pencil, or even if you’re a longtime user, you may not be familiar with all of its features. In this blog post, we’ll cover how to use the Apple Pencil on both the iPad Pro and iPhone.
How to Use the Apple Pencil on iPad Pro: First, open up your favorite drawing app and connect your iPad Pro to your computer using the USB cable. Once connected, open up the Files app on your iPad and select Import… from the menu bar. Select the PDF file that you want to import and click Open.
Once opened, you’ll see the content of the document on your iPad. To start drawing with the Apple Pencil, simply draw with your finger like you would any other pen and then use the built-in eraser to erase mistakes. You can also use several gestures with the Apple Pencil including rotating it around its axis (like a compass) and flipping it over so that one end is flat and the other is curved.
Tap the App Store Icon
Tap the iPhone and iPad section at the top of the App Store screen
Scroll to the bottom of the page and tap Pencil
Scroll to the bottom of the Pencil screen and tap Purchase
Tap Install.
Apple Pencil support on iPad Pro is currently limited to drawing and writing. The Pencil has a variety of features, including pressure sensitivity and tilt support, that can be used for creative purposes. This guide will show you how to use the Pencil on iPad Pro.
Tap the Menu Button
To open the Pencil’s Settings, tap the iPad’s bottom right corner (3 lines down from “Settings”), and select “Pencil.”
To start drawing with the Pencil, make sure it’s charged and connect it to your iPad Pro. Tap the App Store icon on your Home Screen, and then tap “Pens & Paper.” Scroll to the bottom of the list and tap “Apple Pencil.”
If you’ve never used an Apple Pencil before, there are a few things you need to know: To start drawing with the Pencil, hold it like a pencil and draw lightly across the screen. To erase something you’ve drawn, press down on the Pencil as you would with a regular pen and then drag your finger across the screen to erase. You can also use Air Command to do things like change brush sizes or pick colors.
Tap the
Apple Pencil on iPad Pro to open the tools palette and select the Drawing Tools. Tap the Eraser to erase mistakes. To move the cursor, drag it with your finger. To create a line, hold down the Apple Pencil button and draw a line by pressing and holding the left mouse button while drawing. To add text, tap on the text field at the bottom of the screen and type in what you want to say.
Scroll Down and tap
How to use the Apple Pencil on iPad Pro
If you’re new to the Apple Pencil, or if you haven’t used it in a while, this guide will show you how to use it on your iPad Pro. The Apple Pencil is a pressure-sensitive stylus that lets you draw, write, and sketch on your iPad Pro. It’s great for creating handwritten notes or sketches, and it works with all of the apps that support handwriting input. Here are some tips on how to use the Apple Pencil:
First things first: make sure that the Apple Pencil is charged. The battery life is about 12 hours, so it’s best to charge it up before you use it. To charge the Apple Pencil, plug it into the lightning connector on the side of your iPad Pro.
To start using the Apple Pencil, open any app that supports handwriting input (like Notes or Mail), and tap on the screen where you want to start drawing or writing. Then, hold down the pencil button on the top of the pen and start drawing or writing. The pressure-sensitive tip will let you draw smooth lines or precise chords with just a few taps.
Tap the Apple Pencil Icon to start using it
The Apple Pencil is a great tool for drawing, note-taking, and more on the iPad Pro.
Here are some tips for using it:
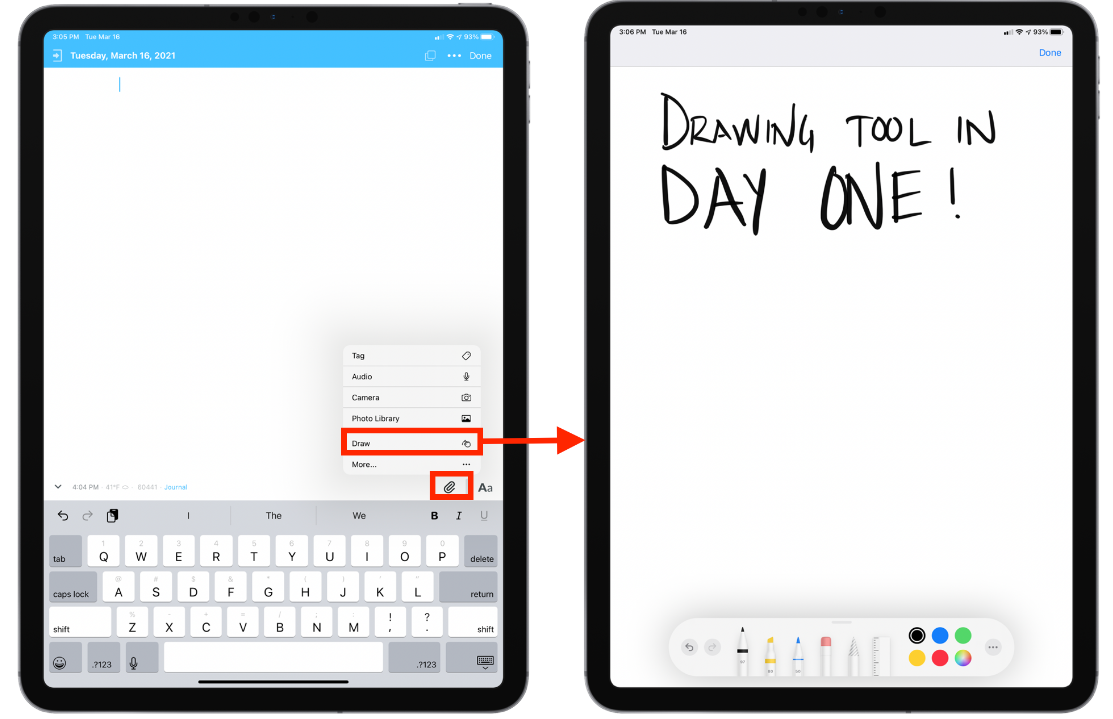
1. To start drawing with the Apple Pencil, first open the app you want to use it. For example, if you want to use it in Notes, open Notes. Then tap the Apple Pencil icon at the top of the screen.
2. To start drawing with the Apple Pencil, first make sure that the app is active and ready to use. To do this, double-click on its home button or press and hold down on its left side until the three dots appear and release.
3. To start drawing with the Apple Pencil, first make sure that your iPad Pro is charged and connected to power. After that, just hold it up so that the tip of the pencil points at one of the icons at the bottom of the screen (see below).
4. To begin shading or coloring with your finger or stylus, just drag a line or shape along the desired path.
